Installing Master CSS
Choose a framework integration, check CDN availability, or generate a stylesheet with the CLI.
On this page


Choose the setup that fits your project: Integrations connects Master CSS to a framework or build tool, and CLI generates a stylesheet for projects without a bundler. CDN provides a plain HTML setup for the default preset.
#Integrations
Use an integration for an existing app. Static rendering is the default: the build finds complete class names in source and delivers a stylesheet to the browser. Choose your framework for its setup files and instructions, or use the automatic installer below.
For runtime and server-rendered setups, see rendering support by integration.
#Before you start
Use Node.js 24 and open the app's root directory, where its package.json lives. The installer updates an existing project; it does not create a framework starter. Your app should already have a working development command.
#Package versions
Use the version shown in this documentation for the installer, integrations and other Master CSS packages. Keep these packages on the same version when installing or upgrading them manually. A package that exists under another npm tag does not establish compatibility with this setup.
For a local runtime evaluation, use the built-checkout CDN example. Keep its script, compiled program and base stylesheet from the same build.
For manual setup or framework-specific files, use the integration guides. If your project has no matching build integration, follow the standalone CLI setup.
#Add Master CSS
Run the installer from the project root. It detects the framework and package manager, updates the setup files, and installs Master CSS packages that match the installer's version.
npm create @master/css@2.0.0 -- --yesReview or limit the setup
--yesaccepts the recommended defaults. These include the core integration, ESLint configuration, the MCP package, and Master CSS guidance inAGENTS.md. The printed MCP registration and skill-installation commands are optional next steps for your coding tools; the installer does not run them.Add
--dry-runto inspect the plan without changing project files or installing the planned dependencies:npm create @master/css@2.0.0 -- --yes --dry-runFor only the core framework setup, add
--minimalto the install command. It skips the ESLint, MCP and agent-guidance additions. If you prefer to install dependencies yourself, add--no-install.#Check the stylesheet connection
Read the setup summary and finish any framework-specific instructions it prints. Some integrations need a follow-up setup command or a separate CSS generation process; see your framework's guide for those steps.
Confirm that your app loads the stylesheet the installer created or updated. That stylesheet should contain:
@import '@master/css';For example, a plain Vite app commonly imports
./style.cssfromsrc/main.js. The CSS file's name and import location depend on the framework. Installing the packages alone does not load the stylesheet into your page.Connect your source to the page
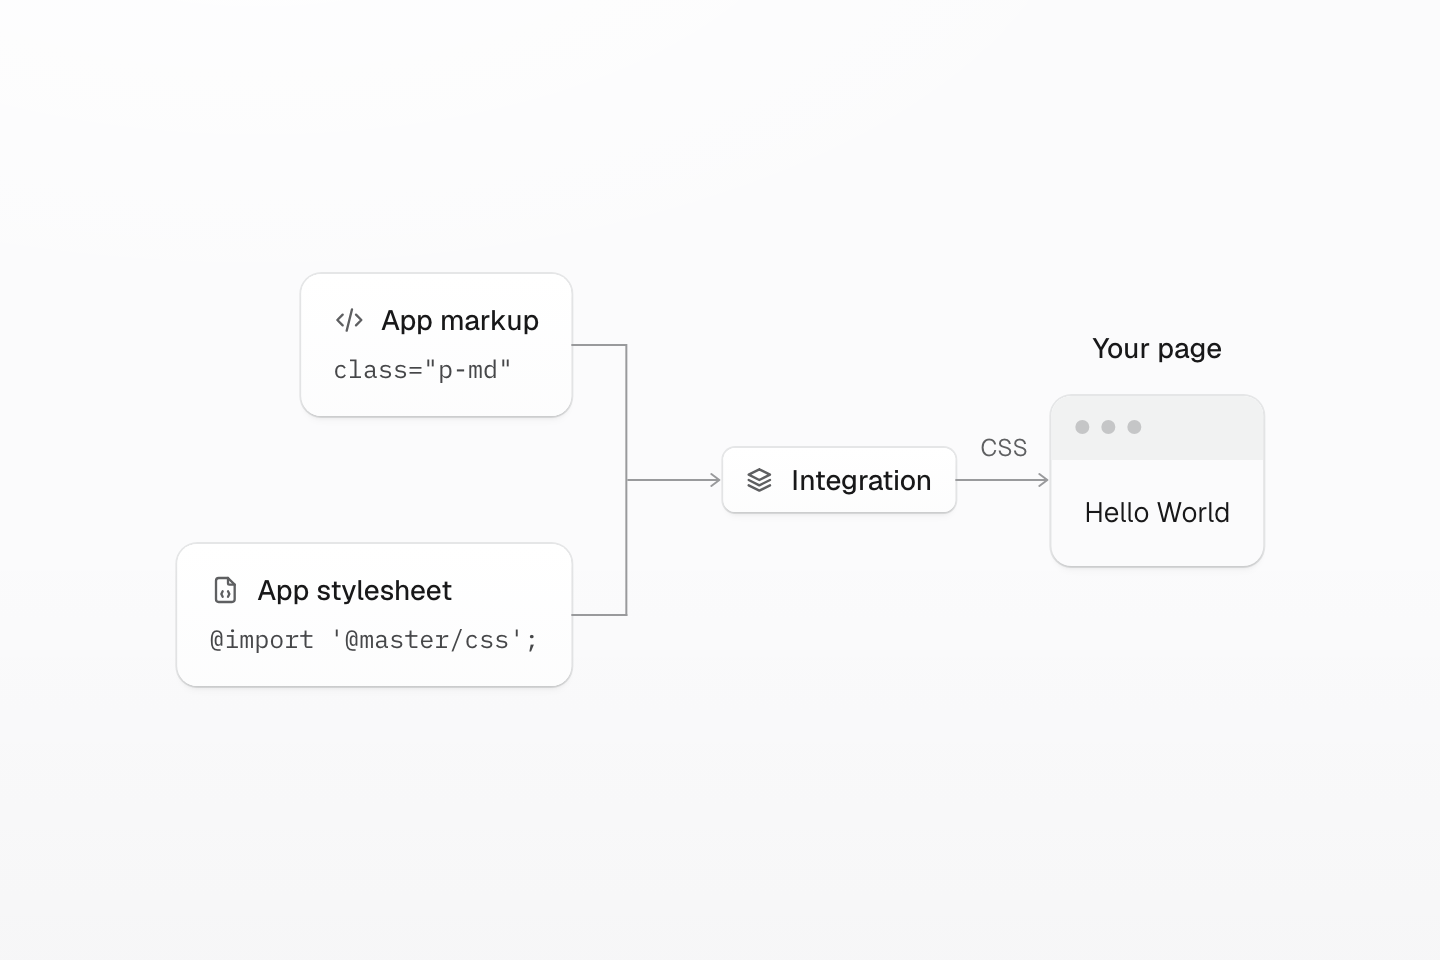
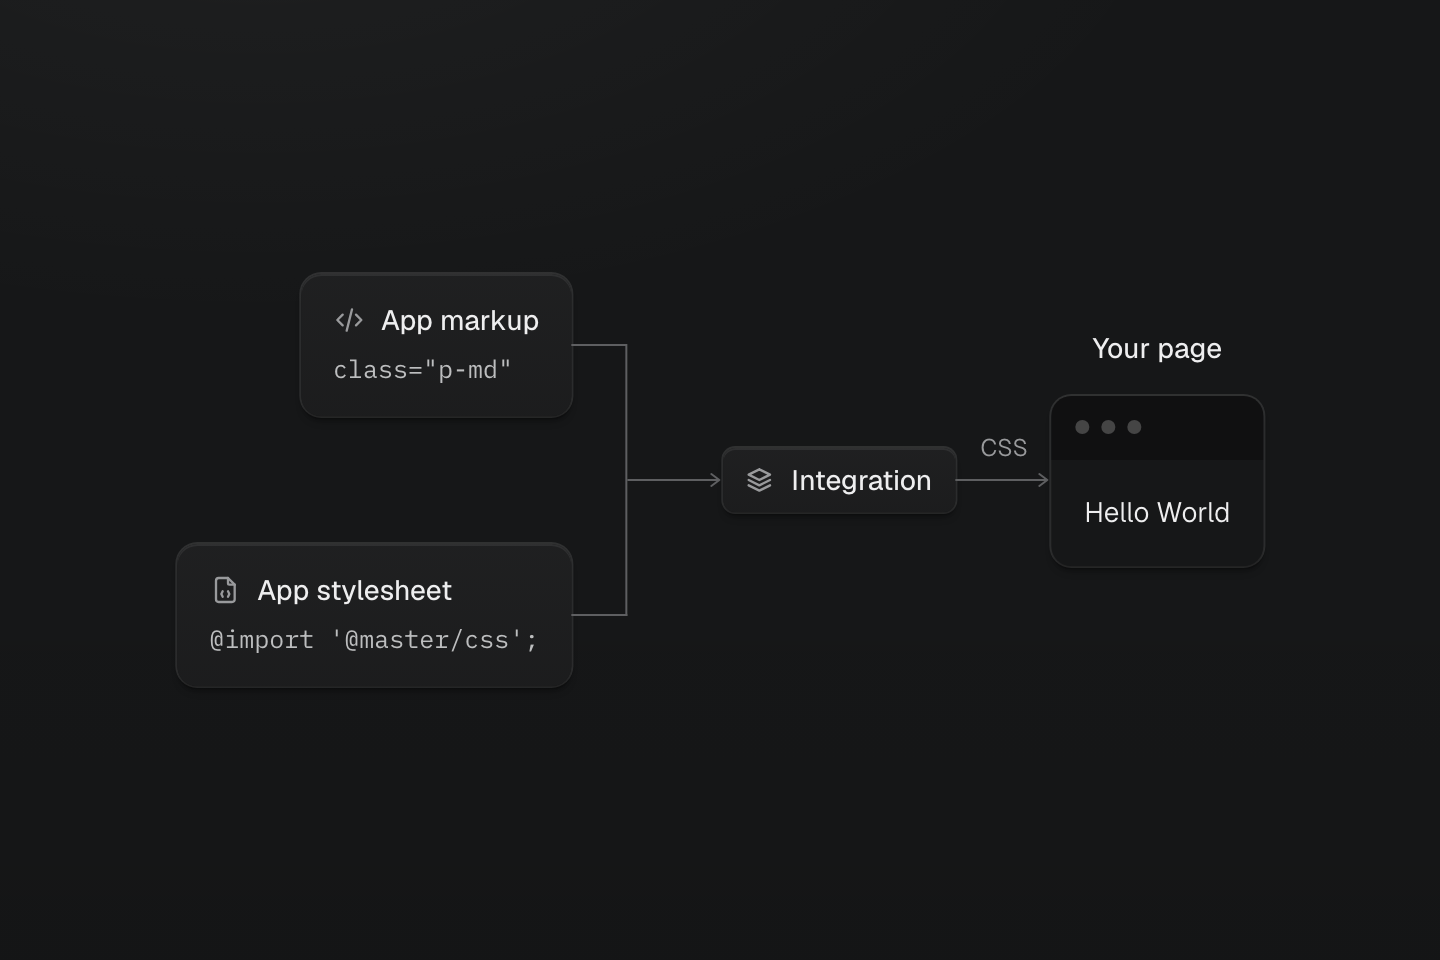
The integration reads class names from source and definitions from your stylesheet. Your app must load that stylesheet for the resulting CSS to reach the page.
Text description
- Source. A complete class such as p-md appears in a source file the integration scans. The app stylesheet imports @master/css to supply the preset definitions.
- Build integration. The two source artifacts feed the configured integration, which generates CSS for the recognized classes. The installer configures this connection; the integration does the ongoing development and build work.
- Page. The app loads its stylesheet so the resulting CSS reaches the browser. The p-md rule applies 1rem of padding with the preset. Package installation alone does not establish the stylesheet import.
#Start using Master CSS
Start or restart your app's development server with its existing command, such as
npm run dev. Put this markup in a visible page or component. In JSX, writeclassNamein place ofclass.Check your first style
<p class="w-fit mx-auto my(0) p-md r-md b(1) b-solid b-line-divider bg-surface-raised text-sm fg-text-strong">Hello World</p>Generated CSS
@layer theme { :root, :host { --color-zinc-90: oklch(24.6% .0022 265); --color-zinc-100: oklch(15% .0016 265) } :root, :host { --color-surface-raised: light-dark(var(--color-white), var(--color-zinc-90)); --color-line-divider: light-dark(oklch(0% 0 none / .12), oklch(100% 0 none / .12)); --color-text-strong: light-dark(var(--color-zinc-100), var(--color-white)) } :root, :host { --color-white: oklch(100% 0 none) } :root, :host { --font-size-sm: .875rem; --text-sm: var(--font-size-sm); --text-sm--line-height: 1.5; --text-sm--letter-spacing: 0; --radius-md: .375rem; --spacing-md: 1rem }}@layer utilities { .text-sm { font-size: var(--text-sm); line-height: var(--text-sm--line-height, normal); letter-spacing: var(--text-sm--letter-spacing, normal) } .bg-surface-raised { background-color: var(--color-surface-raised) } .b-line-divider { border-color: var(--color-line-divider) } .r-md { border-radius: var(--radius-md) } .b-solid { border-style: solid } .b\(1\) { border-width: calc(1 * 1px) } .fg-text-strong { color: var(--color-text-strong) } .my\(0\) { margin-block: calc(0 * 1px) } .mx-auto { margin-inline: auto } .p-md { padding: var(--spacing-md) } .w-fit { width: fit-content }}With the preset, p-md adds 1rem of padding on every side of the text.You should see text inside a small bordered surface. Change
p-mdtop-lgand save: its padding should grow from1remto1.5remon all four sides. This checks that changes in your source reach the page, beyond the installer completing successfully.
Verify the whole path with one small edit
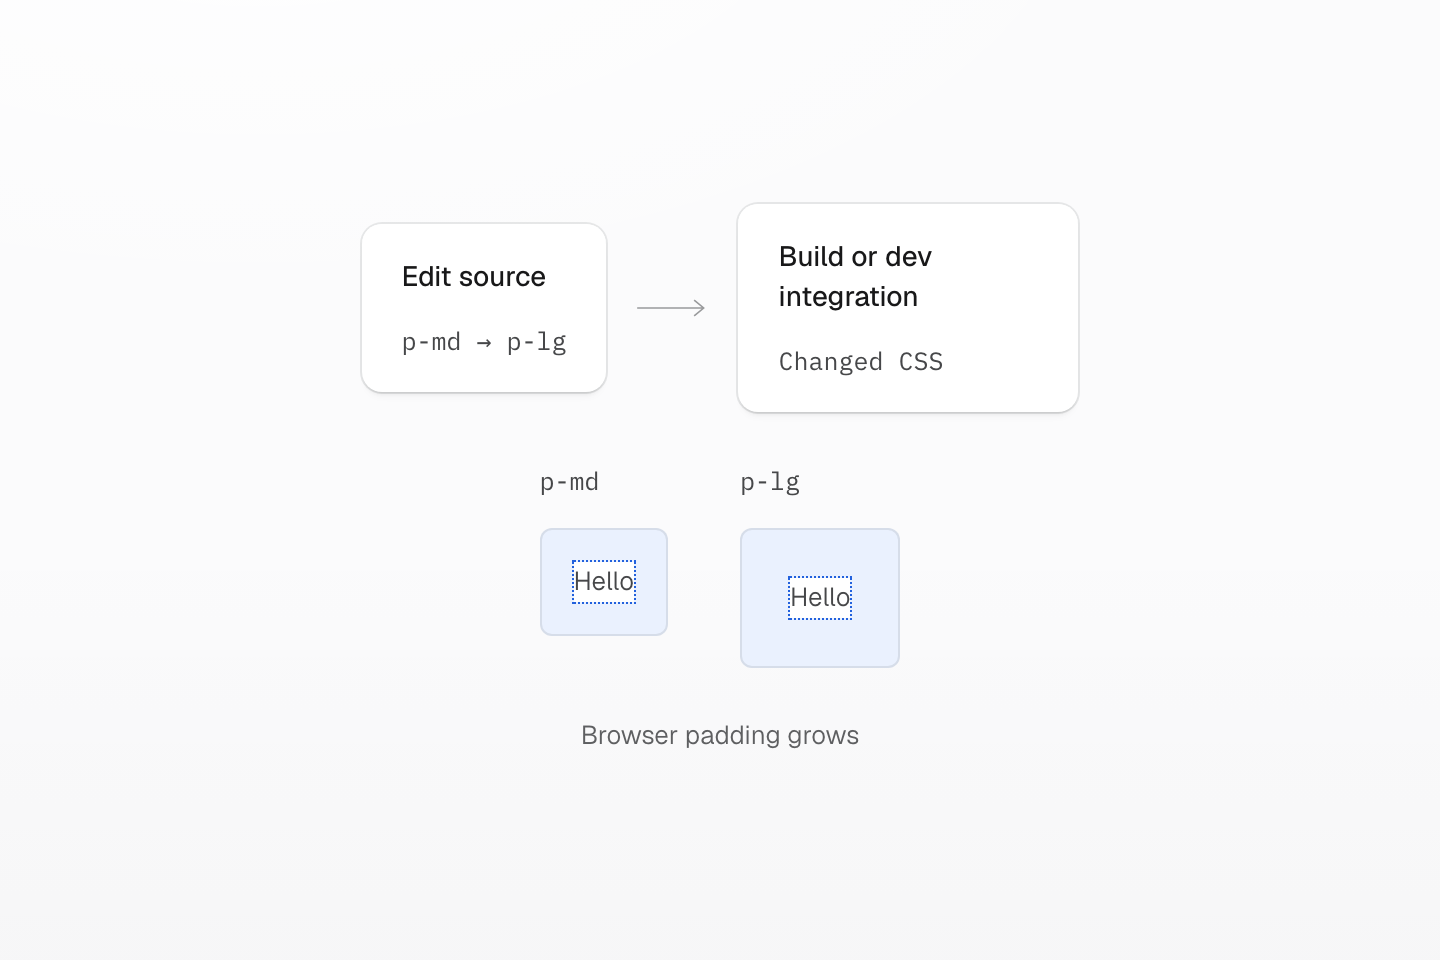
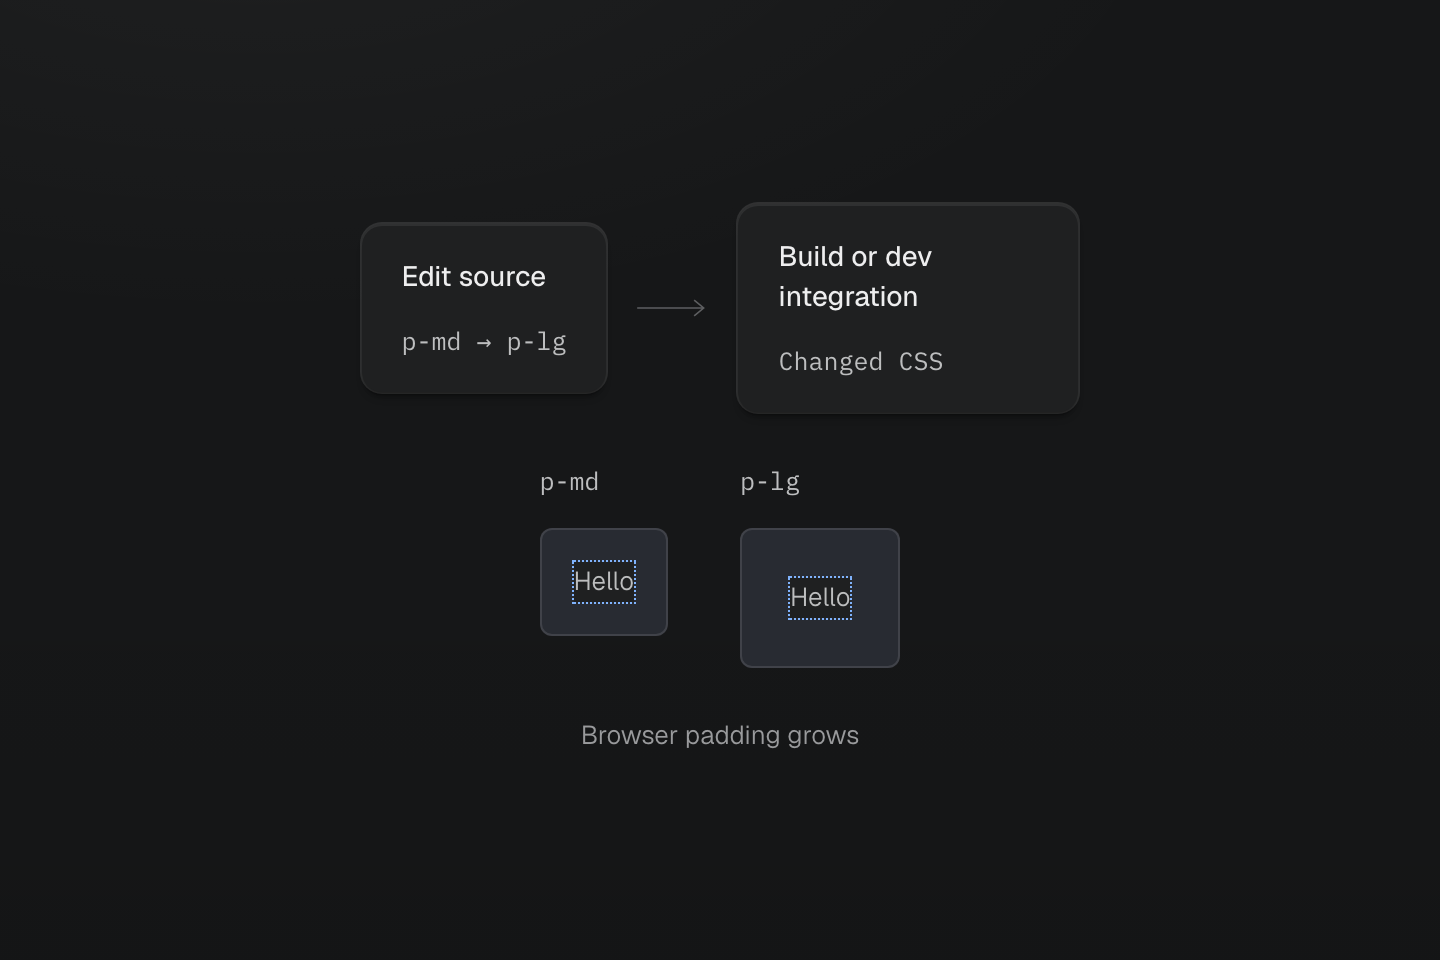
A successful install is only the first step. Changing the class checks discovery, generation and stylesheet delivery together.
Text description
A source edit changes p-md to p-lg, the compiled padding changes, and the browser box visibly grows.
#CDN
A CDN installation runs Master CSS in the browser without a build tool. It suits a plain HTML prototype; generated styles depend on JavaScript. Use an integration or the CLI when the page needs styles without JavaScript.
Keep the runtime script, compiled program and preset stylesheet on the same Master CSS version. The template uses matching versioned URLs. The same package version requirement applies to Integrations and CLI.
Save this template as index.html:
<!DOCTYPE html><html lang="en" hidden><head> <meta charset="utf-8"> <meta name="viewport" content="width=device-width, initial-scale=1"> <link rel="preload" as="style" href="https://cdn.master.co/css-preset@2.0.0/src/base.css"> <link rel="preload" as="script" href="https://cdn.master.co/css-runtime@2.0.0"> <link rel="preload" as="fetch" crossorigin href="https://cdn.jsdelivr.net/npm/@master/css-runtime@2.0.0/dist/default-program.bin"> <link rel="stylesheet" href="https://cdn.master.co/css-preset@2.0.0/src/base.css"> <script src="https://cdn.master.co/css-runtime@2.0.0"></script></head><body> <h1 class="m-2xl italic font-5xl font-heavy fg-text-strong">Hello World</h1></body></html>The heading should have a 3rem margin, a 2.5rem italic font at weight 900, and the preset's strong text color. Change font-5xl to font-6xl: the text grows to 3rem. The runtime also observes class changes made by JavaScript.
The stylesheet supplies the base rules and layer order. The classic script starts automatically, loads its matching compiled program, then generates the initial classes after the document finishes parsing. It removes hidden when those rules are ready. The three preload links start the stylesheet, script, and program requests early; the binary uses as="fetch" crossorigin because the runtime fetches data, not a module. The binary preload and runtime fetch use the jsDelivr destination directly because the Master CDN redirect does not carry CORS headers. The CDN setup uses the default preset; use an integration to compile custom @theme or @utility definitions.
Try a local build
From a built checkout, copy packages/preset/src/base.css, packages/runtime/dist/global.min.js, and packages/runtime/dist/default-program.bin into one directory beside index.html. Keep the script and program from the same build.
Replace both stylesheet URLs with ./base.css, both script URLs with ./global.min.js, and the program preload URL with ./default-program.bin. Serve the directory over HTTP and open index.html. The runtime resolves the program beside an explicit script file; at a Master CDN or jsDelivr npm package entry, it resolves dist/default-program.bin inside that package.
hidden is optional. It prevents an unstyled first paint; handled program-loading errors and the runtime's three-second startup timeout reveal the content. If JavaScript is disabled or the script itself cannot download, it cannot remove the attribute. Omit hidden when content must stay readable in those cases, or deliver static CSS.
For a Content Security Policy, allow the CDN and its jsDelivr redirect target for scripts, stylesheet loading and program fetching (connect-src), and allow the runtime's generated stylesheet. No Wasm is fetched. See Runtime rendering for loading and hydration behavior.
#CLI
Generate a static stylesheet from your HTML without adding a bundler. The CLI scans complete class names and writes CSS that you load with a normal stylesheet link. Use this setup when your project does not have a matching framework integration.
#Create your CSS entry
Create a stylesheet that imports the default Master CSS entry.
@import "@master/css";#Run the build command
Run the command to scan sources and write
master.css.npx @master/css-cli generate "index.html" --output master.css --watch#Load the generated stylesheet
Save the document below as
index.html. The watcher generatesmaster.cssfrom its class names. Serve the directory and open the page to see the styled paragraph.Check the installed styles
<!DOCTYPE html><html lang="en"><head> <meta charset="utf-8"> <meta name="viewport" content="width=device-width, initial-scale=1"> <link rel="stylesheet" href="./master.css"> </head><body> <p id="master-check" class="w-fit m(0) p-md b-solid b(1) b-line-divider r-md text-sm font-regular bg-surface-raised fg-text-strong">Hello World</p></body></html>A neutral surface, a fine border, small corners and 1rem of padding on every side.
#Build for deployment
The watch command stays running and updates the output when a selected source changes. For a production build, omit --watch so the command writes its output and exits:
npx @master/css-cli generate "index.html" --output master.cssDeploy index.html, master.css and the neighboring CSS assets referenced by the generated stylesheet. Preserve their relative paths: copying only master.css can leave its imported styles missing. Keep each generated asset set together when publishing a new build.
Load the deployed page and check that every stylesheet request succeeds. The paragraph should keep its generated padding, border and surface colors with JavaScript disabled. Scanning class names explains how to include sources outside the ordinary application scope.
#If the style does not appear
Check that the page renders the markup you edited and loads the app stylesheet. Then check that the build integration is enabled and scans that source file. Keep class names complete, as in p-lg; constructing them from fragments such as p-${size} prevents a static scan from seeing the final class.
If the installer reports an unrecognized framework or incomplete setup, follow the matching integration guide or the CLI guide. For files outside the normal application scope, see Scanning class names.
Once the spacing change works, continue with the Syntax tutorial to build a card with interaction states and responsive conditions.